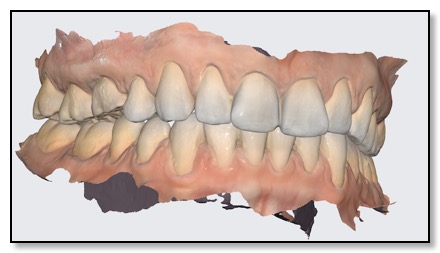
Surgical Guides: Dental Implant Process - Ceramic and Metal
Bone Grafting, 3D Printed Surgical Guides, Temporary Stay Plate, Optical Abutment & Crown
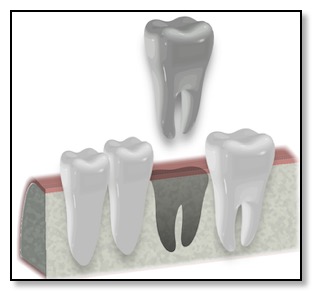
Extraction of Damaged or Cracked Teeth
After discussing with Dr. Tsai and determining that your tooth cannot be saved with a root canal or crown, we will prescribe antibiotics as a precautionary step. When it comes time for the extraction and grafting procedure, Dr. Tsai will make sure you're comfortable by giving you local anesthesia. The tooth, along with its roots, will be gently removed, leaving an empty space.
To ensure complete healing and get rid of any remaining infection, Dr. Tsai might rinse the area with antibacterial fluid and let it naturally fill with healthy blood. This helps the bone grafting material solidify and promote proper bone growth.
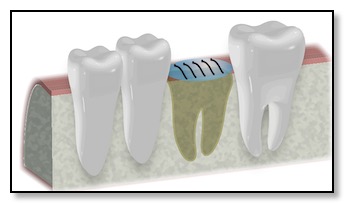
Jawbone Preparation through Bone Grafting (if necessary)
While extracting the tooth, Dr. Tsai will also clean the socket and prepare it for bone grafting and the application of a membrane. This step is crucial for the healing process, especially if you're considering a dental implant, particularly an all-ceramic one. The healthy blood present in the socket will flow into the bone grafting chips and serve as a framework, blending with the bone grafting material.
As a result, the fluid thickens and helps facilitate healing around the bone grafting structure. Over the next four to five months, your body will gradually absorb the bone graft chips, replacing them with your own natural bone. This integration process typically takes around four to five months to complete.
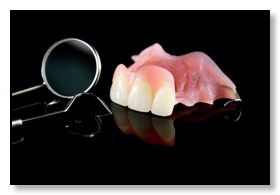
Optional Temporary Stay Plate "Flipper"
If the tooth we're removing is in the smile line, meaning it's visible when you smile, we can take a 3D scan of your teeth and create a temporary stay plate at our dental lab.
This plate does not function like a real denture and is lightweight, so you can't use it for eating. Its purpose is purely aesthetic, but it can really boost your smile's appearance in photos, social situations, and everyday life. Lots of people opt for this temporary stay plate to feel more confident about their smile while they're healing after getting the implant.
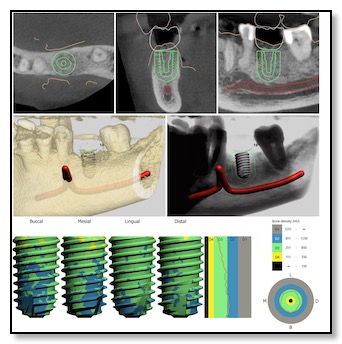
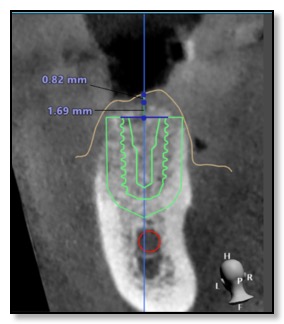
Surgical Guide Design
Patients often ask, "How does Dr. Tsai figure out exactly where to place the dental implant in my jawbone?" In the past, it relied a lot on the dentist's experience and judgment, as they would slightly pull back the gum tissue to assess the situation.
But thanks to recent advancements in digital dentistry, things have changed. Dr. Tsai is one of the few dentists in the Bay Area who has an in-house CT scanner (3D X-ray) and a 3D digital impressions camera.
She combines these technologies with a 3D printer. Here's how it works: she creates a digital model of your jawbone structure and overlays it with a 3D scan of your teeth and gums. Then, she aligns it with your natural bite to evaluate your biting and chewing patterns. This helps her determine the best position for the dental implant.
After this process, she collaborates with her lab to 3D print a template that acts as a guide for placing the implant with utmost precision regarding depth, angle, and location.
Designing this surgical guide is a meticulous process that usually takes about three weeks. It's especially crucial for all-ceramic dental implants, as well as standard ones.
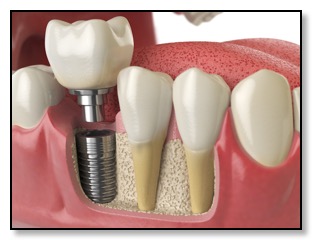
Placement of Dental Implants and Bone Integration
Now that the surgical guide is ready, placing the implant in your jawbone is pretty quick. To make sure the surgery goes smoothly, Dr. Tsai might prescribe a round of antibiotics before placing the implant. The actual placement, along with a confirmatory CT scan to double-check its position, usually takes about an hour. Dr. Tsai will numb the area with local anesthesia, use the surgical guide to line things up perfectly, use different bone drills, and secure the implant in place. Depending on your situation, she might attach a healing cap right away or use a smaller cover screw for healing later on. It takes around four to five months for the implant to integrate with the surrounding bone, a process called bone integration or healing. The exact duration depends on things like your oral cavity chemistry, any medications you're taking, and your overall health.
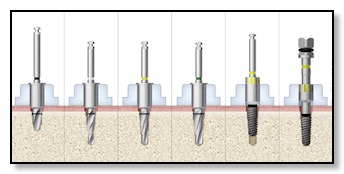
Optical Scan for Custom Abutment and Crown Placement
During the first appointment, if there isn't already a healing cap in place, Dr. Tsai will attach one. It helps the gum tissue grow around the implant, making sure the gum line looks good for the final restoration. Gum tissue tends to heal pretty fast, usually within a few days to a week. At this point, you'll come back for a final optical 3D scan of your teeth, bite, and implant location. This scan is used in collaboration with a dental lab to create a custom abutment and crown.
Once the lab finishes making these restorations, you'll have a final appointment at our office to have them put in, tightened down, and polished. Most people don't need any adjustments, but if you feel that the crown is too high or if there are any sharp spots, you can come back to our office for necessary tweaks in the following weeks.
How Long Does The Dental Implant Process Take?
The whole process of getting all-ceramic or regular dental implants usually takes around seven to eight months, assuming the tooth extraction is necessary. If your tooth is already missing, the timeline is cut in half since there's no need to wait for socket and bone graft healing. Dr. Tsai often does multiple ceramic dental implants at once using the 3D scanning and surgical guide methods mentioned earlier. This speeds up the healing process and reduces any discomfort for patients.
If you have any questions about ceramic dental implants or the implant procedure, don't hesitate to reach out to us. We offer a free dental implant consultation1 because we understand that this is a big investment of both time and money. We want to clear up any uncertainties and provide a comprehensive treatment plan so that you have a smooth experience
» Oral Surgeons and Dental Implants
» All Ceramic Dental Implants
» Dental Implants, Bridges, Crowns, & Partial Dentures
» Bone Grafting & Sinus Lifts
» Second Opinions for Dental Implants
» Cracked Tooth Syndrome
» Frequently Asked Questions about Dental Implants
» How to calculate your dental insurance copays?
» Before and After photos of our patients
» Z-SYSTEMS® All Ceramic Dental Implants
Have questions about dental implant surgical guides and dental implants?
email or call us: (650)-583-5880
We'd love to hear from you.
📩
Send us Email
📅
Request Appointment
1Consultation is for new placement dental implant related treatment only.
Dr. Sherry Tsai surgical guides to treat cracked tooth syndrome, root canals, grafting, dental implants and oral surgery in Millbrae, San Bruno, Burlingame, San Mateo and the Bay Area